This week I decided to do some what of an instructional post. Not really a step by step tutorial but just show how you can create a professional marketing type product just by taking a picture in your basement. With a few photography tools and some Photoshop skills I created an ad out of something new to my life. I received some Sears gift cards for my birthday recently and just this past weekend went and procured my first cordless drill. So I'm a little behind on some things, so what.
I thought instead of just taking a picture of my drill I would try and make it a more appealing shot. The first thing that came to mind was a print ad for a cordless drill. Mind you, I am not a marketing expert so I didn't try anything fancy with the words used.
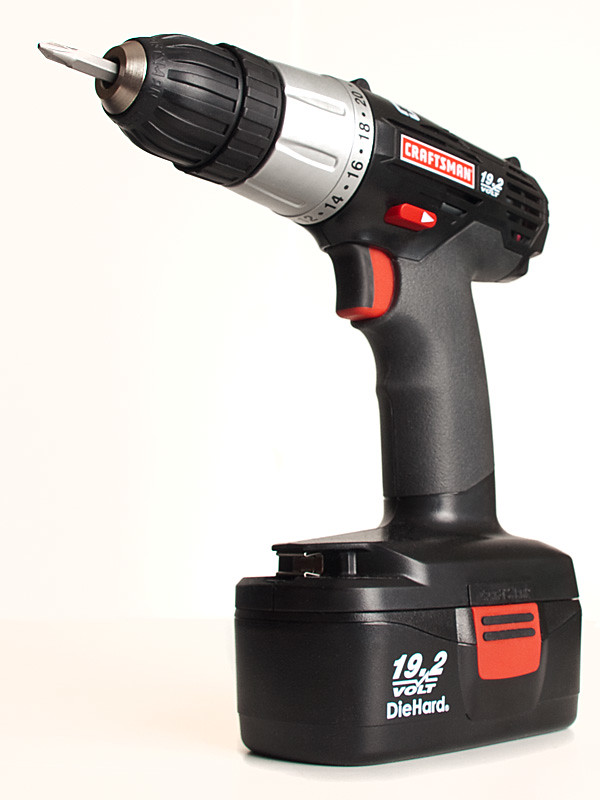
The idea I had was to have a sort of "out of bounds" shot of the drill. I wanted to make it look like a three dimensional shot. I knew I wanted a shot from below to make the drill look superior and commanding, as if I was looking up at a monument of it's greatness. Okay, so I'm a little excited to have a cordless drill in my life, gees it's 2011 and I just got one, cut me some slack. Anyway back to the drill monument.
I already had in mind to use a white background and then add other elements to the photo later in Photoshop. I sort of have a set up for doing small product like photography but it's not exactly what I want as an end result. I used to own a lightbox that I built a few years back from poster board, but I gave that to a friend when I wasn't using it anymore. DOH! Here are a couple shots of the setup for any of you looking to take on a project.
Ideally when shooting a product shot you want the light to be even, big and surrounding. Often times photographers surround elements with white boards and use big soft boxes for the light source. In most cases you want the light to be
diffused, not
specular. Lightboxes work very well because the light comes into the box and then bounces from everywhere. The lightbox above works great for small items like knives, or jewelery. Actually the friend I gave it to uses it to take pictures of his wife's ceramics.
But, alas, I did not have the lightbox anymore so I had to go a different route. I decided to go with a single light source very close with a big shoot through umbrella and hope it was large enough and soft enough. I was hoping that I could do this on what would be a shoe string budget for a photographer that doesn't have a Profoto set with big soft boxes. Everything that I used included three pieces of poster board from Wal-mart, a light stand, a 400ws strobe (this easily could be a hot shoe flash unit like a Nikon SB800) and a 48inch shoot through umbrella. I put everything on a table so I could get that "look from below" angle with the camera.
I used my wide angle lens open as wide as it would go then got really close to the subject. I wanted the wide angle distortion to this shot so that the tip of the drill looked closer than the rear. That would help me achieve to out of bounds look I wanted later in post. Fortunately for me I had enough spill from the light that it lit the background as well and I didn't have to put an additional light on the background to blow it out. Here is the shot of the setup.
The umbrella was a large enough light source, the reflections on the drill are nice and soft and the light is very even across the whole subject. In Photoshop I made some contrast and sharpening adjustments. I also went around and cleaned up any color distortions in the white on the background. There are lots of different ways to do this, for this one I used the dodge tool set to highlights at 100%. Once I had the drill the way I wanted it I was ready to bring it into a larger image for additional elements.
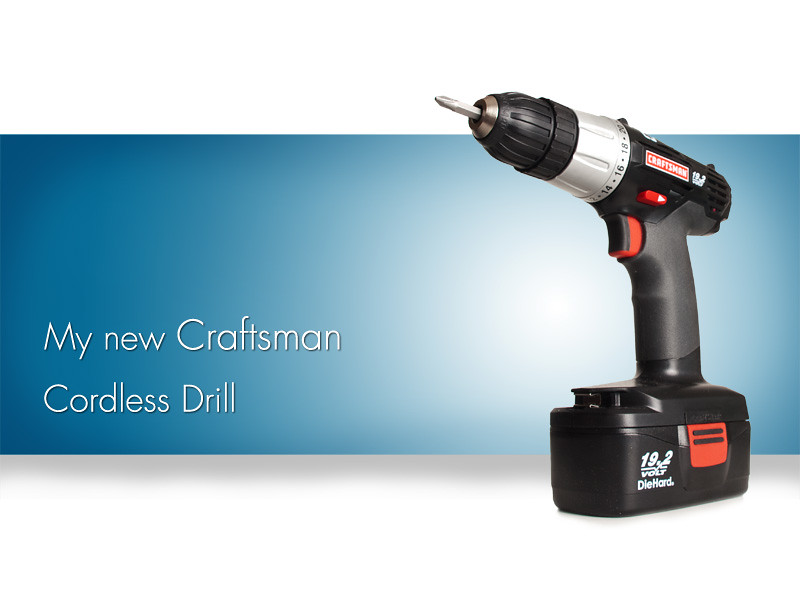
I wasn't looking for anything fancy from an ad design perspective but I wanted to show that with some quick elements added in Photoshop we could show how a photo like this would be used in an ad campaign say for print or for a website.
Like I said I wanted the photo to have a sort of "out of bounds" feel to it. This type of editing gives the photo a three dimensional feel. You can accomplish this by making the subject larger than its frame or in this case the banner behind it. Additionally I added a gradient inside the banner (from white to blue) to accentuate where my light source was coming from and I added a small gradient on the bottom of the banner to give the feel of a floor, adding even more to the three dimensional feel.
So all put together this is how it looks. Introducing My new Craftsman cordless drill!!! Yay!!